Update: Firefox has used the WebExtensions API as its extension API since 2017. We encourage you to visit Extension Workshop to learn more about browser extensions and how you can build an extension for Firefox. You can find reference documentation for the WebExtensions API on MDN.
Please do not reference this article for extension development, as it is out-of-date. If you are the developer of a legacy add-on, please refer to this page for resources to help you migrate to the current API.
Our objective
We will create a Firefox extension to find all links in the current web page, highlight those which have a target attribute and alert you how many links it found. The good part is that once you have done this, you have both an understanding of Firefox extension development as well as a blueprint for any extension you would want to develop in the future.
What you need – setting up the developing environment
First, let’s start with setting up your development environment. You need Firefox (duh) and basically whatever code editor you prefer. Then, there are some recommended things to do to prepare Firefox:
Create a different development profile
The first step is to create a different profile in Firefox, since you will do some settings and changes that you probably don’t want for your regular profile. In my case, I’ve created a new development profile named “dev”. The steps to do this are:
Profile manager on Windows
Open the Windows Start menu and choose the Run option (on Vista, it might not be there – just press Windows key + R in that case). In the run dialog, write firefox -P and press enter/click OK. Choose Create Profile in the dialog and follow the steps.
Profile manager on Mac
Open the Terminal (located under /Applications/Utilities) and type in /Applications/Firefox.app/Contents/MacOS/firefox -profilemanager. Choose Create Profile in the dialog and follow the steps.
Profile manager on Linux
Open a terminal, use CD to navigate to your Firefox directory and then enter ./firefox -profilemanager. Choose Create Profile in the dialog and follow the steps.
Configuration settings for Firefox
Open Firefox through the Profile Manager (process described above, or set the development profile as default during extension development). Then enter about:config in the address bar. It will warn you about changing settings, but it’s ok since what you will do is only minor changes for development. You can filter the existing settings, and if any of the below settings don’t exist, you can just create them.
Recommended settings
These are good to enable extension errors in the Firefox Error Console (Tools > Error Console), disable XUL caching and such.
javascript.options.showInConsole = truenglayout.debug.disable_xul_cache = truebrowser.dom.window.dump.enabled = true
Optional settings
These aren’t necessary, but they might help you out. Personally, I don’t use these.
javascript.options.strict = trueextensions.logging.enabled = true
Point your Firefox extensions directory to your extension
Instead of constantly preparing and reinstalling your extension, there’s a simple way to add a pointer from your Firefox extensions directory to your code location. To do this, you must first find your profile directory:
Find your profile directory
The profile directory is where you will find all the settings for your Firefox profiles, including extension information.
Find profile directory on Windows
In Windows 2000 and XP, open Explorer and go to C:\Documents and Settings\[your user name]\Application Data\Mozilla\Firefox\Profiles and in Vista, go to C:\Users\[your user name]\AppData\Roaming.
Find profile directory on Mac
Open the Terminal and type in CD ~/Library/Application\ Support/Firefox/profiles/. There you will find your Firefox profiles, and they will be named with letters and numbers, followed by a dot (.) and then your profile name, e.g. 12a3bc4d.dev.
Find profile directory on Linux
Open a terminal and type in CD ~/.mozilla/. In that location, you will find all your Firefox profiles, and they will be named with letters and numbers, followed by a dot (.) and then your profile name, e.g. 12a3bc4d.dev.
Pointing to an extension
In your development profile folder, you will find a folder named extensions. In it, you will have code for all your installed extensions. Instead of placing your code there, you can create a pointer file. Do that by creating a file with a unique name for you (this will have to be the same as you chose for your em:id value in your install.rdf file – more on that below).
In the case of our example, create a file named linktargetfinder@robertnyman.com, without any extension, and in it just point it to where you will have your code, e.g. C:\extensions\ (Windows) or ~/Sites/linktargetfinder/ (Mac).
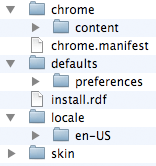
Creating folder structure and files
What is needed to have a good base for your extension development, is to create the structure of the extension code. Start by creating this hierarchy:
install.rdf
We begin with the intimidating code of install.rdf. This is where you will have all the meta information about your extension, which versions of Firefox it supports and other assorted information. Our install.rdf will look like this:
<?xml version="1.0"?>

<RDF xmlns="http://www.w3.org/1999/02/22-RDF-syntax-ns#"
     xmlns:em="http://www.mozilla.org/2004/em-rdf#">

	<Description about="urn:mozilla:install-manifest">
		<em:id>linktargetfinder@robertnyman.com</em:id>

		<em:name>Link Target Finder</em:name>
		<em:version>1.0</em:version>
		<em:type>2</em:type>
		<em:creator>Robert Nyman</em:creator>

		<em:description>Finds links that have a target attribute</em:description>
		<em:homepageURL>http://www.robertnyman.com/</em:homepageURL>
		<em:optionsURL>chrome://linktargetfinder/content/options.xul</em:optionsURL>

		<em:targetApplication>

			<Description>
				<em:id>{ec8030f7-c20a-464f-9b0e-13a3a9e97384}</em:id>
				<em:minVersion>2.0</em:minVersion>
				<em:maxVersion>3.1b2</em:maxVersion>

			</Description>
		</em:targetApplication>
	</Description>
</RDF>
Scary, right? Well, even if your not used to RDF it’s not that bad at all. Like most code, there’s some mandatory information that you will never need to change, and then some of your own to sprinkle in. The interesting parts for us are:
In the Description node
em:id- This is where you add your unique developer id, of your own choosing. Note that this has to be the same as the pointer file you created above.
em:name- The name of your extension.
em:version- Current version of your extension.
em:type- The type declares that is an extension, as opposed to, for instance, a theme.
em:creator- Well, you!
em:description- Describes your extension functionality. Will be shown in the Tools > Add-ons window.
em:homepageURL- The URL of your extension’s web site.
em:optionsURL- The URL to where you will have your file for editing options/preferences.
In the Description/em:targetApplication node
em:id- This value is the actual id of Firefox. Change this if you want to develop for Thunderbird or something else.
em:minVersion- The minimum version of Firefox required to run the extension. Valid Application Versions.
em:maxVersion- The maximum version of Firefox required to run the extension. Valid Application Versions.
Read about more options in Install Manifests.
chrome.manifest
The chrome of Firefox is everything around the content window. i.e. web browser toolbar, menus, statusbar etc. The next file for our extension, which will probably feel a bit awkward to edit, is the chrome.mainfest file. This one, however, is in conjunction with install.rdf the key to how your extension will be added to Firefox, and how it will work. Our chrome.manifest file looks like this:
content     linktargetfinder    chrome/content/
content     linktargetfinder    chrome/content/ contentaccessible=yes
overlay chrome://browser/content/browser.xul chrome://linktargetfinder/content/browser.xul

locale	linktargetfinder	en-US	locale/en-US/

skin	linktargetfinder	classic/1.0	skin/
style	chrome://global/content/customizeToolbar.xul	chrome://linktargetfinder/skin/skin.css
So, what are all those options? Let’s go through them:
content linktargetfinder chrome/content/- The path to where your extension content files will be found.
content linktargetfinder chrome/content/ contentaccessible=yes- Same as the above, but when
contentaccessible=yesis added, it allows Firefox 3 and later to access the extension’s files and show them in the web browser (like within a web page). Found this excellent help through Web pages accessing chrome:// is forbidden. overlay chrome://browser/content/browser.xul chrome://linktargetfinder/content/browser.xul- The path to which file you will use to override web browser elements, and add items to the toolbar, menu and statusbar.
locale linktargetfinder en-US locale/en-US/- Used for localization of content.
skin linktargetfinder classic/1.0 skin/- Skin reference.
style chrome://global/content/customizeToolbar.xul chrome://linktargetfinder/skin/skin.css- Style overlays for chrome pages.
More information can be found in Chrome Manifest.
chrome folder
Ok, once the mandatory parts are out of the way, now things start to get interesting. This is also when we start to look at XUL, which stands for XML User Interface Language. It is developed by Mozilla to create interfaces in Firefox, Thunderbird etc.
First, within the chrome/content folder, create three files:
browser.xuloptions.xullinkTargetFinder.js
browser.xul
This is the file we will use to override some of the default look of the web browser, i.e. add a button to the toolbar, an item to the Tools menu and a statusbar icon. Let’s look at the complete browser.xul file and then break it down:
<?xml version="1.0"?>
<?xml-stylesheet href="chrome://linktargetfinder/skin/skin.css" type="text/css"?>
<!DOCTYPE linktargetfinder SYSTEM "chrome://linktargetfinder/locale/translations.dtd">
<overlay id="sample" xmlns="http://www.mozilla.org/keymaster/gatekeeper/there.is.only.xul">

		<script src="linkTargetFinder.js" />

		<menupopup id="menu_ToolsPopup">
			<menuitem label="&runlinktargetfinder;" key="link-target-finder-run-key" oncommand="linkTargetFinder.run()"/>
		</menupopup>

		<keyset>

			<key id="link-target-finder-run-key" modifiers="accel alt shift" key="L" oncommand="linkTargetFinder.run()"/>
		</keyset>

		<statusbar id="status-bar">
			<statusbarpanel id="link-target-finder-status-bar-icon" class="statusbarpanel-iconic" src="chrome://linktargetfinder/skin/status-bar.png" tooltiptext="&runlinktargetfinder;" onclick="linkTargetFinder.run()" />
		</statusbar>

		<toolbarpalette id="BrowserToolbarPalette">
			<toolbarbutton id="link-target-finder-toolbar-button" label="Link Target Finder" tooltiptext="&runlinktargetfinder;" oncommand="linkTargetFinder.run()"/>
		</toolbarpalette>
</overlay>
First, there some general XML syntax, then you include your CSS code and set a DOCTYPE for localization. It’s followed by the overlay root element with its Ghostbuster-inspired namespace (developers are truly geeks ![]() ).
).
After that you’re free to write whatever XUL you want, and basically it’s like HTML should’ve been. What I mean with that is that it is filled with basic interface options that can’t be found anywhere in HTML. For a complete overview of what you can do, please read the XUL Reference.
In our code here, we start with adding a menu option to the Tools menu in Firefox, and connect it to a keyboard shortcut:
<menupopup id="menu_ToolsPopup">

	<menuitem label="&runlinktargetfinder;" key="link-target-finder-run-key" oncommand="linkTargetFinder.run()"/>
</menupopup>

<keyset>
	<key id="link-target-finder-run-key" modifiers="accel alt shift" key="L" oncommand="linkTargetFinder.run()"/>
</keyset>
Followed by adding an icon to the Firefox statusbar:
<statusbar id="status-bar">

	<statusbarpanel id="link-target-finder-status-bar-icon" class="statusbarpanel-iconic" src="chrome://linktargetfinder/skin/status-bar.png" tooltiptext="&runlinktargetfinder;" onclick="linkTargetFinder.run()" />
</statusbar>
And at the end, we add a button to the Firefox toolbar:
<toolbarpalette id="BrowserToolbarPalette">
	<toolbarbutton id="link-target-finder-toolbar-button" label="Link Target Finder" tooltiptext="&runlinktargetfinder;" oncommand="linkTargetFinder.run()"/>
</toolbarpalette>
Note that you need to go to View > Toolbars > Customize… to add your button to the visible toolbar.
In the above examples, you might have noticed the &runlinktargetfinder; code. That is used for localizing text, and its translation can be found in the locale folder. More on that later.
Another thing to notice, which can be tricky at first, is that some ids and classes for XUL elements actually have meaning for its display, stemming from core Firefox code. Make sure to read the XUL Reference thoroughly for the elements you’re using.
If you want to use regular HTML elements instead of/together with XUL, you can include the XHTML definition in your root element, and then include any HTML element with the html: prefix. Like this:
<overlay id="sample" xmlns="http://www.mozilla.org/keymaster/gatekeeper/there.is.only.xul" xmlns:HTML="http://www.w3.org/1999/xhtml">

<html:input type="submit" value="Send" />
options.xul
This file is used for the options/preferences dialog for your extension, and its path is pointed out in the install.rdf file in the Description/em:optionsURL node. The complete options file for our extension looks like this:
<?xml version="1.0"?>
<?xml-stylesheet href="chrome://global/skin/" type="text/css"?>

<prefwindow
     title="Link Target Finder Preferences"
     xmlns="http://www.mozilla.org/keymaster/gatekeeper/there.is.only.xul">

	<prefpane label="Link Target Finder Preferences">
		<preferences>
			<preference id="link-target-finder-autorun" name="extensions.linktargetfinder.autorun" type="bool"/>

		</preferences>

		<groupbox>
			<caption label="Settings"/>
			<grid>
				<columns>
					<column flex="4"/>

					<column flex="1"/>
				</columns>
				<rows>
					<row>
						<label control="autorun" value="Autorun"/>
						<checkbox id="autorun" preference="link-target-finder-autorun"/>

					</row>
				</rows>
			</grid>
		</groupbox>

	</prefpane>

</prefwindow>
Again, some regular XML information and styling of the content. It then uses some XUL to layout the content of the preferences dialog. The interesting part here, though, is connecting the user input to the actual settings for the extension (those settings are to be found in the prefs.js file, mentioned in detail below).
To start with, you create a preferences group in the options.xul file with your desired preferences. Then, give each preference an id and connect it to the extension’s real preferences with the name attribute:
<preferences>
	<preference id="link-target-finder-autorun" name="extensions.linktargetfinder.autorun" type="bool"/>
</preferences>
Then you create an element and add a preference attribute to it, pointing to the before-chosen idattribute for the preference in the preferences group. It will then automatically connect its value to that specific preference.
<checkbox id="autorun" preference="link-target-finder-autorun"/>Note that you don’t need to add an OK button for the dialog – for instance, on Macs there won’t be one while it’s automatically added for Windows users. All about system compatibility, my friends.
linkTargetFinder.js
If you’re like me, this is where you will feel at home. Good ol’ JavaScript code. ![]()
What’s nice here is that you can script any element in the XUL and any element in the HTML content window as well. All you need to access the content window is to precede your document call with the content keyword, like this:
content.document.getElementsByTagName("a");Here’s the complete code of the linkTargetFinder.js file:
var linkTargetFinder = function () {
	var prefManager = Components.classes["@mozilla.org/preferences-service;1"].getService(Components.interfaces.nsIPrefBranch);
	return {
		init : function () {
			gBrowser.addEventListener("load", function () {
				var autoRun = prefManager.getBoolPref("extensions.linktargetfinder.autorun");
				if (autoRun) {
					linkTargetFinder.run();
				}
			}, false);
		},

		run : function () {
			var head = content.document.getElementsByTagName("head")[0],
				style = content.document.getElementById("link-target-finder-style"),
				allLinks = content.document.getElementsByTagName("a"),
				foundLinks = 0;

			if (!style) {
				style = content.document.createElement("link");
				style.id = "link-target-finder-style";
				style.type = "text/css";
				style.rel = "stylesheet";
				style.href = "chrome://linktargetfinder/skin/skin.css";
				head.appendChild(style);
			}

			for (var i=0, il=allLinks.length; i<il; i++) {
				elm = allLinks[i];
				if (elm.getAttribute("target")) {
					elm.className += ((elm.className.length > 0)? " " : "") + "link-target-finder-selected";
					foundLinks++;
				}
			}
			if (foundLinks === 0) {
				alert("No links found with a target attribute");
			}
			else {
				alert("Found " + foundLinks + " links with a target attribute");
			}
		}
	};
}();
window.addEventListener("load", linkTargetFinder.init, false);
While it’s a fair bit of code, it is also very basic. When the window loads, it runs the init method of the linkTargetFinder object. If the preference autorun is set to true, it calls its run method immediately. Otherwise, it will only be called when the toolbar button, menu item or statusbar icon is clicked. This happens through the oncommand attribute on the elements in the browser.xul file.
The code in the run method is pretty straight-forward. It adds a CSS file from the extensions chrome folder to the current document, finds all links in it, loops through them and checks if they have a target attribute, counts those, highlights them and alerts you with the number of hits.
As you can see, there’s a pointer in the code to something called gBrowser. That is how to get a reference to the current web browser, and you could also use getBrowser() as well. Note that this sort of code is only available from within the XUL context of the web browser. More information and options can be found in Tabbed Browser.
The only unusual part for a JavaScript is the variable prefManager, which connects to Firefox preference manager, and later gets the autorun preference with the help of this code:
var autoRun = prefManager.getBoolPref("extensions.linktargetfinder.autorun");The three types of extension preferences are string, integer and boolean, and the six methods to work with them are:
getBoolPref()setBoolPref()getCharPref()setCharPref()getIntPref()setIntPref()
defaults folder
Within the defaults folder, you create a preferences folder and in that one a file named pref.js. This is used for the preferences you want to use for your extension, and looks like this:
pref("extensions.linktargetfinder.autorun", false);locale folder
Used for localization. In our case here, we just have one child folder for en-US content, but it can be easily extended. That folder has a file named translations.dtd, which contains translations for entities used in XUL files. Our file looks like this:
<!ENTITY runlinktargetfinder "Run Link Target Finder">Remember &runlinktargetfinder; in the browser.xul file? This is where it gets its translation.
skin folder
Now when we have all functionality in place, let’s make things a little more pretty (just a little, ok?). In our skin folder, we have three files: skin.css, status-bar.png and toolbar-large.png. The images are, naturally, used for the toolbar and statusbar respectively.
The CSS in skin.css is used for setting the image for the toolbar, the size and space for the statusbar icon and the highlight look of links with a target attribute. The code looks like this:
#link-target-finder-toolbar-button {
	list-style-image: URL("chrome://linktargetfinder/skin/toolbar-large.png");
}

#link-target-finder-status-bar-icon {
	width: 83px;
	margin: 0 5px;
}

.link-target-finder-selected {
	outline: 2px solid red !important;
}
Packaging and installing
Firefox extensions are delivered like XPI files, and those are basically just ZIP files with another extension. Therefore, when you’re finished with your extension, all you need to do is ZIP your files together and give it an XPI extension. Note: do not ZIP the containing folder for your extension, just its contents (chrome folder, chrome.manifest and install.rdf files etc).
Once you have your XPI file, you can just drag and drop it into Firefox, and it will automatically install.
Packaging with Windows
Select all the contents of your extension folder, right-click and choose Send To > Compressed (Zipped) Folder. Rename it to .xpi instead of .zip and you’re done!
Packaging with Mac
Open the Terminal, navigate to your extension with the CD command and then type in zip -r LinkTargetFinder.xpi *. Ta daa!
Packaging with Linux
Open a terminal, get to your extension folder, and type in zip -r LinkTargetFinder.xpi * All done!
Distribution of your extension
There are two options of distributing your extension. Either use addons.mozilla.org or host it yourself. If you do it yourself, you can specify an updateURL in your install.rdf file, but note that since Firefox 3 it has to be a secure location, e.g. through SSL or similar.
Personally, I’d recommend addons.mozilla.org for greater reach, auto-update pushing and statistics. The downside of it, though, is that the review process can take quite some time for your extension to get an approval. Before that it can still be downloaded as an experimental add-on, but people need to have an addons.mozilla account and log in to do so.
To make sure it doesn’t take longer than necessary, I recommend reading
Successfully Getting your Addon Reviewed.
Downloads
All the code I’ve created here is available both as a ZIP file of everything, so you can start experimenting, change stuff and see what happens. It is also available as an XPI file, which you can install in your Firefox just to test the functionality (drag and drop it into Firefox).
Happy extension developing!
I hope this has been a good, albeit long, introduction to Firefox extension development and that it has helped you to grasp concepts you hadn’t gotten full control over yet. Good luck, and don’t hesitate to ask if you have any questions!
Mattias Hising wrote on
Michael Kaply wrote on
seth bindernagel wrote on
Paul wrote on
Robert Nyman wrote on
Robert Nyman wrote on
Austin King wrote on
rbango wrote on
robcee wrote on
Anji wrote on
Aditi Mittal wrote on
Robert Nyman wrote on
Lubes wrote on
Jason Thompson wrote on
Sandeep wrote on
Mike Camino wrote on
Lee wrote on
John Doe wrote on
lj saminathan wrote on
Stefan Krüger wrote on
Naveen Mandadi wrote on
Naveen Mandadi wrote on
Naveen Mandadi wrote on
Mike Berthram wrote on
Mike Berthram wrote on
pd wrote on
güzel sözler wrote on
kral oyunlar wrote on
Oyunlar wrote on
indir wrote on
Dizi izle wrote on
dizi izle wrote on
promosyon wrote on
Andreas Eibach wrote on
blogindir wrote on
Andreas Eibach wrote on
müzik dinle wrote on
rafael wrote on
Gopinath wrote on
Shreyas Agasthya wrote on
GeoNOregon wrote on
Shreyas Agasthya wrote on
Sandy wrote on
Sandy wrote on
Firstman wrote on
lehenryjr wrote on
Anup wrote on