Heka v0.5 Released

The last few months have been bustling here in Heka-land. Our community of users and contributors has been growing steadily, and real world use is paying off in feedback and pull requests. Those of us who have been working full time on Heka are taking turns instead working with Heka, deploying it and actually using it to solve operational problems. Our experiences have helped us to understand the rough edges, and to be excited about how useful Heka has already become. It’s also given us great ideas about improving usability, some of which we’ve already implemented.

It’s our pleasure to announce the release of Heka v0.5. This is a significant release, full of so many goodies that they won’t all fit into a single announcement. Expect to see additional posts on some of the new features soon. Here are some highlights (full details are available in the changelog):

  • The new LogstreamerInput allows you to specify any layout, ordering, and rotation scheme for your log files. It will read the files in order, keeping track of its location in the data stream, even through restarts and/or file rotations.
  • We’ve made major improvements to the Lua environment we expose for real time data processing and graphing. Our work building Lua filters for internal customers allowed us to start abstracting out some of the more common tasks that need to happen, and some of these we’ve put into modules available for use in every Heka SandboxFilter.
  • Among these Lua modules are our rsyslog and nginx decoder modules. Setting them up is easy: copy the log format configuration string from the other server’s config file and paste it into your Heka config file. Then wire your decoder up to a LogstreamerInput to read those server’s files from the filesystem (or one of UdpInput, TcpInput, AMQPInput, etc. to handle a stream over the network).
  • We’ve added the ProcessDirectoryInput, which manages a set of processes to be run at specified intervals, generating Heka messages from their output. You can add, remove, or change any of the data collectors without needing to restart or reconfigure Heka itself.
  • The Heka -> Heka TCP transport story is much improved. The TcpOutput now supports reconnecting with exponential back-off, along with queuing to disk to prevent data loss during connection drops. We’ve also added TLS support with full client cert authentication to the TcpInput; the TcpOutput; and the heka-flood, heka-sbmgr, and heka-sbmgrload command line tools.

Release packages for Linux and OSX are available on github. As always, we’d love to hear from you on the Heka mailing list, or in the #heka channel on irc.mozilla.org, or (by popular demand) in the new #heka channel on irc.freenode.net.

A Better Firefox Sync

We’re pleased to announce that the new version of Firefox Sync is available to test in Firefox Aurora. Current Firefox Sync users love the service, but have given us feedback that it wasn’t easy enough to setup or add devices, and in particular recover from a lost device. We listened to this feedback and built an easier way to safely synchronize data between the desktop and mobile versions of Firefox.

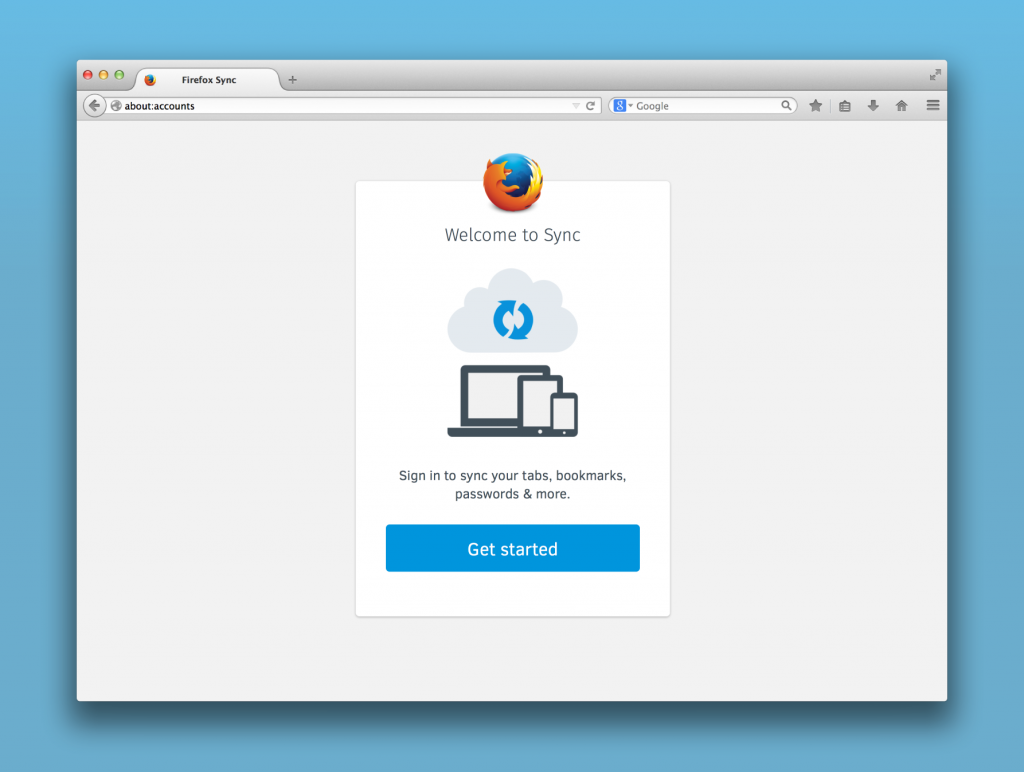
The new Firefox Sync makes it much easier to do initial setup and to add multiple devices. To test the new Firefox Sync you can simply enter an email address and choose a strong, memorable password in Firefox for Windows, Mac or Linux. Then you can easily add more computers or Android devices to sync.

welcome-to-sync

How do I use the new Firefox Sync?
The new Firefox Sync feature is available in Firefox Aurora. For more details on how to test Firefox Sync, read this Sumo article.

Strong Security

We believe in trust through transparency, that’s why we’ve worked in the open to develop a strong security system around the new sync.

In simplifying the Firefox Sync set up and sign in flow, it was important not to compromise on the security of a user’s data. This release brings the same level of end to end encryption our current sync product employs, but is much easier to set up.

The key to improved convenience in the new Firefox Sync is data encryption based on a key that is derived from your password. This means the stronger your password is, the better your protection. We’ve taken this basic approach and hardened it in three ways:

First, client side key stretching is a technique that allows us to protect against man in the middle attacks, even when SSL credentials are compromised.

Second, end to end encryption means even if our servers are compromised, it is extremely difficult to access a user’s data.

And finally, public key cryptography and the BrowserID protocol allow for separation between authentication, authorization, and data storage servers – minimizing the number of servers that handle authentication material, and reducing our attack surface.

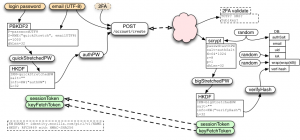
You can read a whole lot more about the security architecture of new sync in the technical documentation on github.

onepw-create

As with the previous version of Firefox sync, users still have the option to take their data with them and host their own sync service using the open source server-side software.

As we gain experience with this new security architecture, we’re eager to continue to find the best way to have both convenient data access and whole-system security.

What’s Next?
We’re currently in the process of preparing the new Firefox Sync feature to ship to our browser users. After that, we’ll integrate synchronization features into Firefox OS.

Finally, to help build out additional Firefox Sync features more easily, we’ve created a robust account system for Firefox users and for partners to build on our user relationships. We are excited to explore what new services we can build on top of this system, to bring new interesting features to Firefox users. We promise to keep the Mozilla mission goals about putting users first, and advancing the open Web, in all service work we and our partners do.

Mark Mayo and Cloud Services Team

Circus 0.10 released

Circus LogoI am very happy to announce the release of Circus 0.10.

Circus is a process & socket manager we’ve been developing at Cloud Services to supervise our different processes on our servers It is built using Python and ZeroMQ.

More information is available at http://circus.readthedocs.org

This new version is a major step forward for the project for two reasons. First, we’ve added Python 3 compatibility and second, we did a major refactoring of the core to make it fully asynchronous.

What’s exciting is that most of the work in this release has been done by contributors external to the Cloud Services team, making Circus what we intended at its inception: an open source tool that’s built by and for the Python & Mozilla communities at large.

Below are 3 interviews of Circus contributors. I have asked them the same set of questions.

Fabien Marty

Meet Fabien Marty from Météo France, the French national weather forecast company. He’s one of the main instigators of the core refactoring and explains us what he’s been doing to make it happen.

Tarek: Hello Fabien. Can you tell us who you are?

Fabien: I am Fabien Marty, I am 34 years old and I’ve been working at Météo France as a technical lead for 7 years.

Tarek: How did you end up using Circus?

Fabien: We’re working on a big internal project in my company, where we need to run and supervise a lot of processes (more than 80 per server) and make sure we control every aspect of the processes’ start and stop sequences.

Unlike a classical web stack, we’re working on a stack that receives a huge amount of data — satellite images, numerical modeling data, sensor data, etc. When a server is being stopped, we need to make sure we don’t lose any incoming data. That’s why the stop sequence can last for more than 5 minutes.

We built our own tool to deal with processes, called “launcher”, but it was a bit clunky. Instead of spending more time fixing it, we looked at existing open source projects and found Circus.

Tarek: How did it go with Circus at first?

Fabien: The first tries were very positive. The documentation was clear and detailed and we were able to install it and start using it right away, replacing our own solution.

Tarek: Did you have some issues?

Fabien: Yeah, we had some issues when we tested the stop sequence. As I’ve explained earlier, we have a very specific use case:

we don’t stop our processes with signals – but with flags we’re setting in a Redis server the stop sequence can last for over 5 minutes, because our processes might have to finish processing some data before shutting down we have to start and stop our processes quite often to avoid any memory issues.

Circus was not quite suited for this use case, but we kind of knew we’d hit this problem.

Tarek: What did you do?

Fabien: We started with Alex Marandon (one of the project developers) fixing a few bugs in Circus here and there and pushed them upstream. We also fixed some documentation bugs we found along the way.

Then we wrote a plugin to deal with reloading processes automatically if the process command line is changed in the configuration.

Finally, we worked on the stop sequence: since our processes can take up to 5 minutes to stop and since Circus’ core was not fully asynchronous, this would lock up the event loop and Circus would become unresponsive to any other command during that window.

After some serious design talks with the Cloud Services team, we started to work on a branch to fix this.

Tarek : Was it easy?

Fabien: Not at all ! We knew it was going to be a lot of work. But it was even bigger than we thought. Our first attempt failed: we tried to add a simple callback system hooked into the PyZMQ event loop but that made the code harder to read and understand.

That’s mainly because Circus has high level methods that are doing basic operations, so adding callbacks on those made the whole thing a callback hell.

For our second attempt, we decided to move to a pure Tornado event loop and use its coroutine decorator. That drastically simplified making Circus’ core asynchronous. Moreover, moving Circus code to Tornado coroutines was a no brainer for its PyZMQ compatibility. The library has its own bundled version of a Tornado eventloop but you can use a plain Tornado eventloop if you want, and everything stays compatible.

The bottom line is that we ended up with even simpler code!

Tarek : Are you happy with the result?

Fabien: Yes, very much. There are still a few rough edges,but it works well now and is way better than our initial custom tool. We spent more time than we initially planned but that was worth it – and we don’t regret that investment. 🙂

Rémy Hubscher

Meet Rémy Hubscher from Novapost, a French Software company. Rémy is a long time Circus contributor

Tarek: Hello Rémy. Can you tell us who you are?

Rémy: Hey Tarek, I am Rémy HUBSCHER, 26 years old and I work for Novapost as an R&D engineer.

Tarek: How did you end up using Circus?

Rémy : We’re deploying our apps in clusters from 3 to 25 servers, in a private cloud on Amazon and Rackspace. We previously used Supervisor and Gunicorn to deploy them.

Our main motivation for using Circus is its decentralised behavior: every server has its own circus daemon and manages processes there. With a single circus-web dashboard it’s easy to manage them all; we can watch the socket, cpu and memory loads in realtime.

Circus is also easy to configure with Saltstack and it’s dead easy to add new processes and sockets in our stacks.

Tarek: How did it go with Circus at first?

Rémy: Great! Installing Circus in our environment was easy and the clear documentation helped us a lot there.

Tarek: Did you have some issues?

Rémy: Yes, we did have some but my colleague Boris Feld and I contributed fixes to the project that took care of them.

One issue that remains is the fact that it’s not possible to automatically close a socket when all the processes that use it are shut down. But this is going to be fixed soon.

Tarek : What did you contribute in Circus?

Rémy: We started contributing a year ago, by adding simple features like bash autocompletion and the shell in circusctl. We were also involved in brainstorming about the clustering feature, and added automatic UDP discovery of circus daemons.

We also organized a three-day hackaton on Circus in our office to work on the clustering, since we needed it.

Circus-web (the web dashboard) was initially built with Bottle, but we moved it to Tornado for simpler integration with PyZMQ

Tarek : Was it easy?

Rémy: Well, it’s still Python so we found solutions eventually. But it’s important to understand the overall architecture and design, and how Tornado’s async works. But, when there’s an issue, the services team is quite responsive on IRC

Tarek : Are you happy with the result?

Rémy: Very happy. We’ve been using Circus for three apps in production and we’re gradually moving everything else to it.

Tarek : What’s next?

Rémy: We’ll help in reviewing the pull requests on the project and answer any questions – and we will be organizing a new hackaton in early 2014, to tackle more clustering features.

Scott Maxwell

Meet Scott Maxwell, who made Circus python 3 compatible!

Tarek: Hello Scott. Can you tell us who you are?

Scott: My name is Scott Maxwell. I’m a veteran of the video game industry (since 1983) but, recently I have been working on the app store for one of the American car companies.

Tarek: How did you end up using Circus?

Scott: We are currently using Supervisord to run our servers. I used supervisor at Sony Online Entertainment and it worked fairly well for me. We are on Python 3.3 so I had to port supervisor to Py3 about a year ago.

Lately, our restart logic has gotten more complex, since we want to bounce uWSGI without losing any connections. We had to build more and more outside of Supervisor. Also, we started querying Supervisor through the RPC mechanism for monitoring purposes, and it started to crash periodically. The Supervisor team never accepted my changes so Supervisord is still limited to Py2 today and I cannot easily get any fixes they might make.

I discovered Circus through a post on the uWSGI site. When I saw that it was using ZeroMQ and that it supported signals and much richer restart hooks, it seemed like exactly what we were looking for.

Tarek: How did it go with Circus at first?

Scott: The functionality looked great, so we were very excited about the potential.

Tarek: Did you have some issues?

Scott: It was a bit of arough start because of our Py3 requirement. Porting a client/server application to Py3 is much harder because exceptions are caught in one process and sent to the other, losing much of the context. Also, right around the time I was finishing up, the big async upgrade dropped.

Once I got the Py3 port done, I realized that a few other features were missing. For instance, supervisor lets you specify the signal to use for stopping the process. Fortunately this was a very easy feature to add to circus.

Tarek: What did you do?

Scott: I just put my head down and got the initial port done. Once I had basic functionlity in place, I issued a pull request and got everything integrated. From there, the real collaboration began.

Since I was new to the project, I lacked deep understanding of how everything fit together. I spent many hours trying to resolve the resource warnings that the Py3 runtime exposed, without great success. But you, Tarek, were able to fix the majority of them very quickly. When I ran into trouble with the flapping plugin, Alex (@amarandon) jumped straight in. Rémy (@natim) was also very helpful.

Tarek: Was it easy?

Scott: The work was hard, but the collaboration was easy.

Tarek: Are you happy with the result?

Scott: Very happy so far. I expect to have my entire stack moved over to circus on one environment in the next few days. Then I will be able to fully judge the result.

Tarek: What’s next?

Scott: I think Circus is complete for my needs at this point. But it is very comforting to know that if I need a new feature that is general purpose enough, the Circus team will take my change in a timely manner. It gives me great confidence moving forward.

If you are interested in contributing to Circus – visit http://circus.readthedocs.org/en/latest/contributing/

Many thanks to Toby Elliott for all the English proofreading. 🙂

— Tarek, on behalf of the Circus team
Heka 0.4: Dashing through your data

The Mozila Services team is happy to announce the release of Heka 0.4, the latest version of our logs and metrics processing platform.

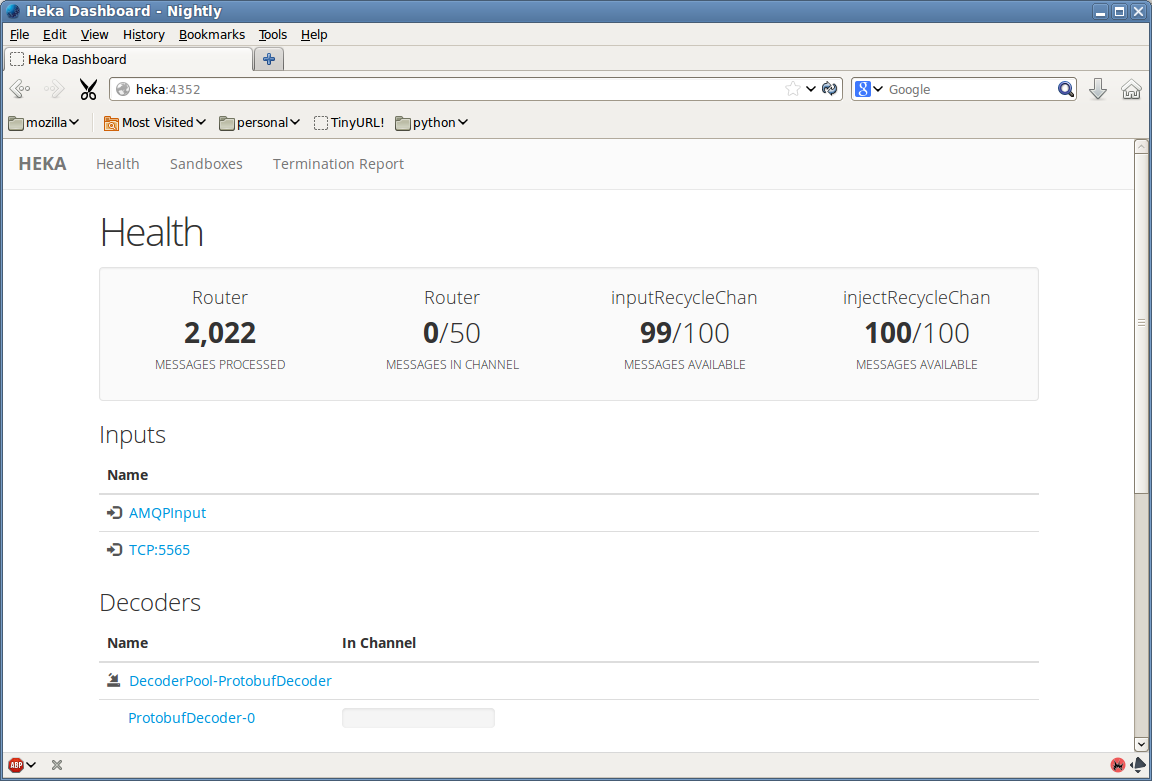
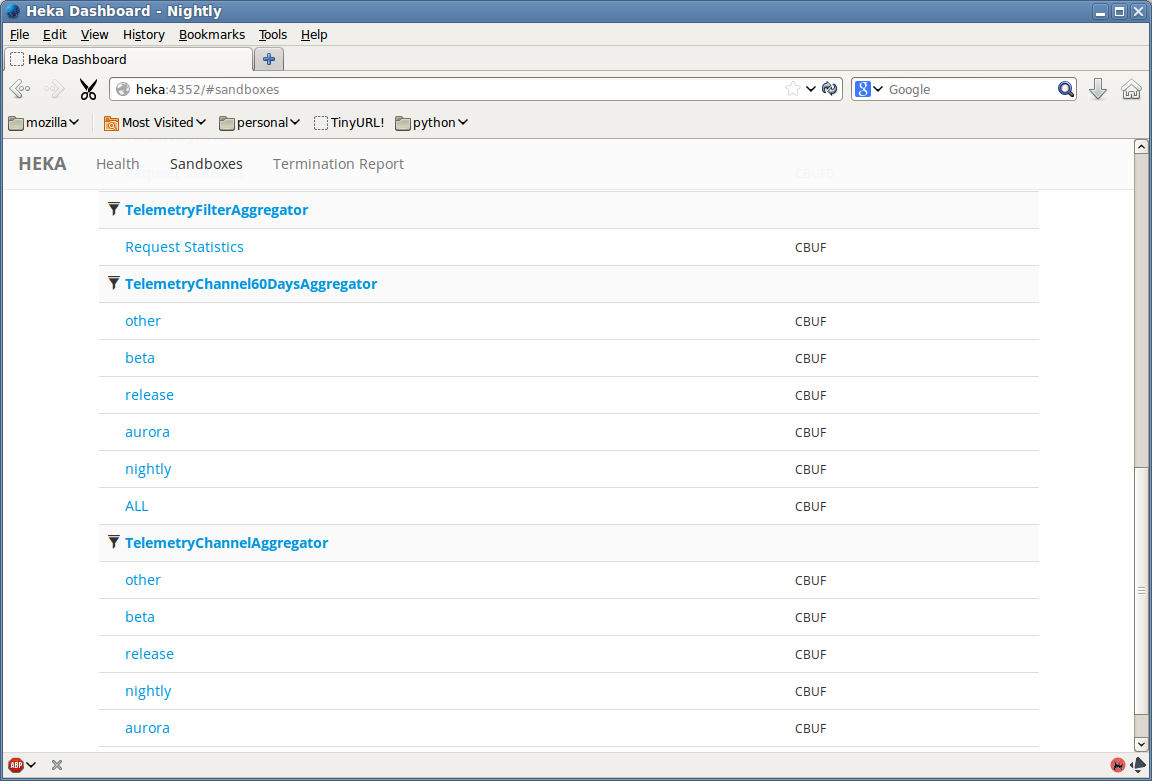
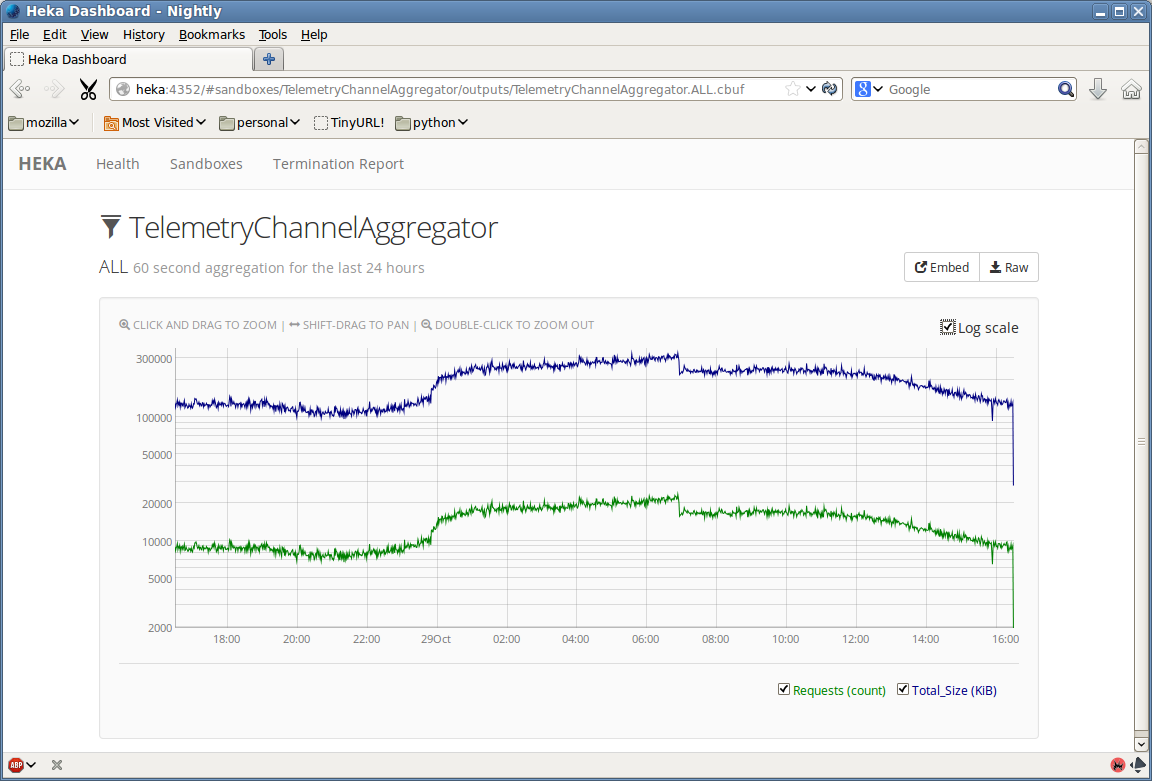
We’ve been hard at work fixing bugs and adding features (see the changelog for a full report). One of the most visible change is a complete overhaul of Heka’s internal dashboard UI. Heka’s prior dashboard UI was just a placeholder, the quickest path to exposing the requisite data, but since the previous release we’ve added a much more attractive Backbone.js-based interface with live updating and greatly improved usability. Using the DashboardOutput you’ll be able to see information on how data is flowing through Heka’s pipeline, view time series graphs generated by filters using circular buffers, and examine any other textual data (including JSON, XML, or any other format) that might be generated by a filter. We’ve been using this internally to help make sense of some of our Telemetry data; the attached screenshots show how this looks.

That’s not all we’ve been up to (see the changelog for the full details). Here are more of the highlights:

  • Heka now supports loading and parsing files from a directory (via the LogileDirectoryManagerInput), instead of requiring that all of the files be specified individually. The specified directory will be watched so new folders and files that are added will automatically start being parsed without the need to reconfigure or restart Heka.
  • We’ve added a ProcessInput that will let Heka launch external processes on the host machine, using the process’s stdout output as the input data.
  • The addition of the PayloadJsonDecoder means that you can now map data extracted from arbitrary JSON text to Heka message fields.
  • Sandboxed Lua filters now have access to LPeg (i.e. parsing expression grammar) and JSON decoding libraries, for sophisticated parsing inside your dynamic filter code.
  • The hekad config can now be specified as a directory in addition to a single file, to allow complex configurations to be spread across multiple TOML files.
  • There is now a global working directory configuration option, allowing plugins to store data relative to a root folder rather than having to maintain a full path for each plugin.
  • We’ve greatly improved our input stream parsing, now supporting multi-line records in the input data (with either token or regular expression specified delimiters). That data can come from a log file, an external process, or a TCP, UDP, or AMQP network connection.
  • Similarly, protocol buffer-encoded Heka messages are now supported whether the protobuf stream comes from a file, an external process, or one of the currently supported network protocols (TCP, UDP, AMQP).
  • It is now possible to use sandboxed Lua code in the decoding step, in addition to the filter plugins that have been supported in prior versions.

As always, we love to hear your feedback. Please join us on the Heka mailing list (highly recommended for all Heka users) and in the #heka IRC channel on irc.mozilla.org, and follow the code, submit bugs, and make suggestions on Github.

Heka Health Report
Heka Health Report
Heka Sandboxes
Heka Sandboxes
Sandbox CBuf Output
Sandbox CBuf Output

Introducing the Mozilla Location Service

The Mozilla Location Service is an experimental pilot project to provide geolocation lookups based on publicly observable cell tower and WiFi access point information. Currently in its early stages, it already provides basic service coverage of select locations thanks to our early adopters and contributors.

A world map showing areas with location data. Map data provided by mapbox / OpenStreetMap.

While many commercial services exist in this space, there’s currently no large public service to provide this crucial part of any mobile ecosystem. Mobile phones with a weak GPS signal and laptops without GPS hardware can use this service to quickly identify their approximate location. Even though the underlying data is based on publicly accessible signals, geolocation data is by its very nature personal and privacy sensitive. Mozilla is committed to improving the privacy aspects for all participants of this service offering.

If you want to help us build our service, you can install our dedicated Android MozStumbler and enjoy competing against others on our leaderboard or choose to contribute anonymously. The service is evolving rapidly, so expect to see a more full featured experience soon. For an overview of the current experience, you can head over to the blog of Soledad Penadés, who wrote a far better introduction than we did.

We welcome any ideas or concerns about this project and would love to hear any feedback or experience you might have. Please contact us either on our dedicated mailing list or come talk to us in our IRC room #geo on Mozilla’s IRC server.

For more information please follow the links on our project page.

Hanno Schlichting, on behalf of the geolocation and cloud services teams

Heka 0.3 released

Those of us here on Mozilla Service’s Heka team were very pleased by the positive response and interest generated by our initial announcement about the project. And we’re even more pleased by the fact that some of you out there have decided to help out, contributing doc tweaks, bug fixes, and, in some cases, completely new plugins back to the Heka core. All the activity has kept us inspired, and we’ve landed a huge number of fixes and improvements ourselves since then. We’re happy to be rolling these out in a new Heka 0.3 release.

A full list of what’s new in this release can be found in the changelog, but here are some of the bigger features:

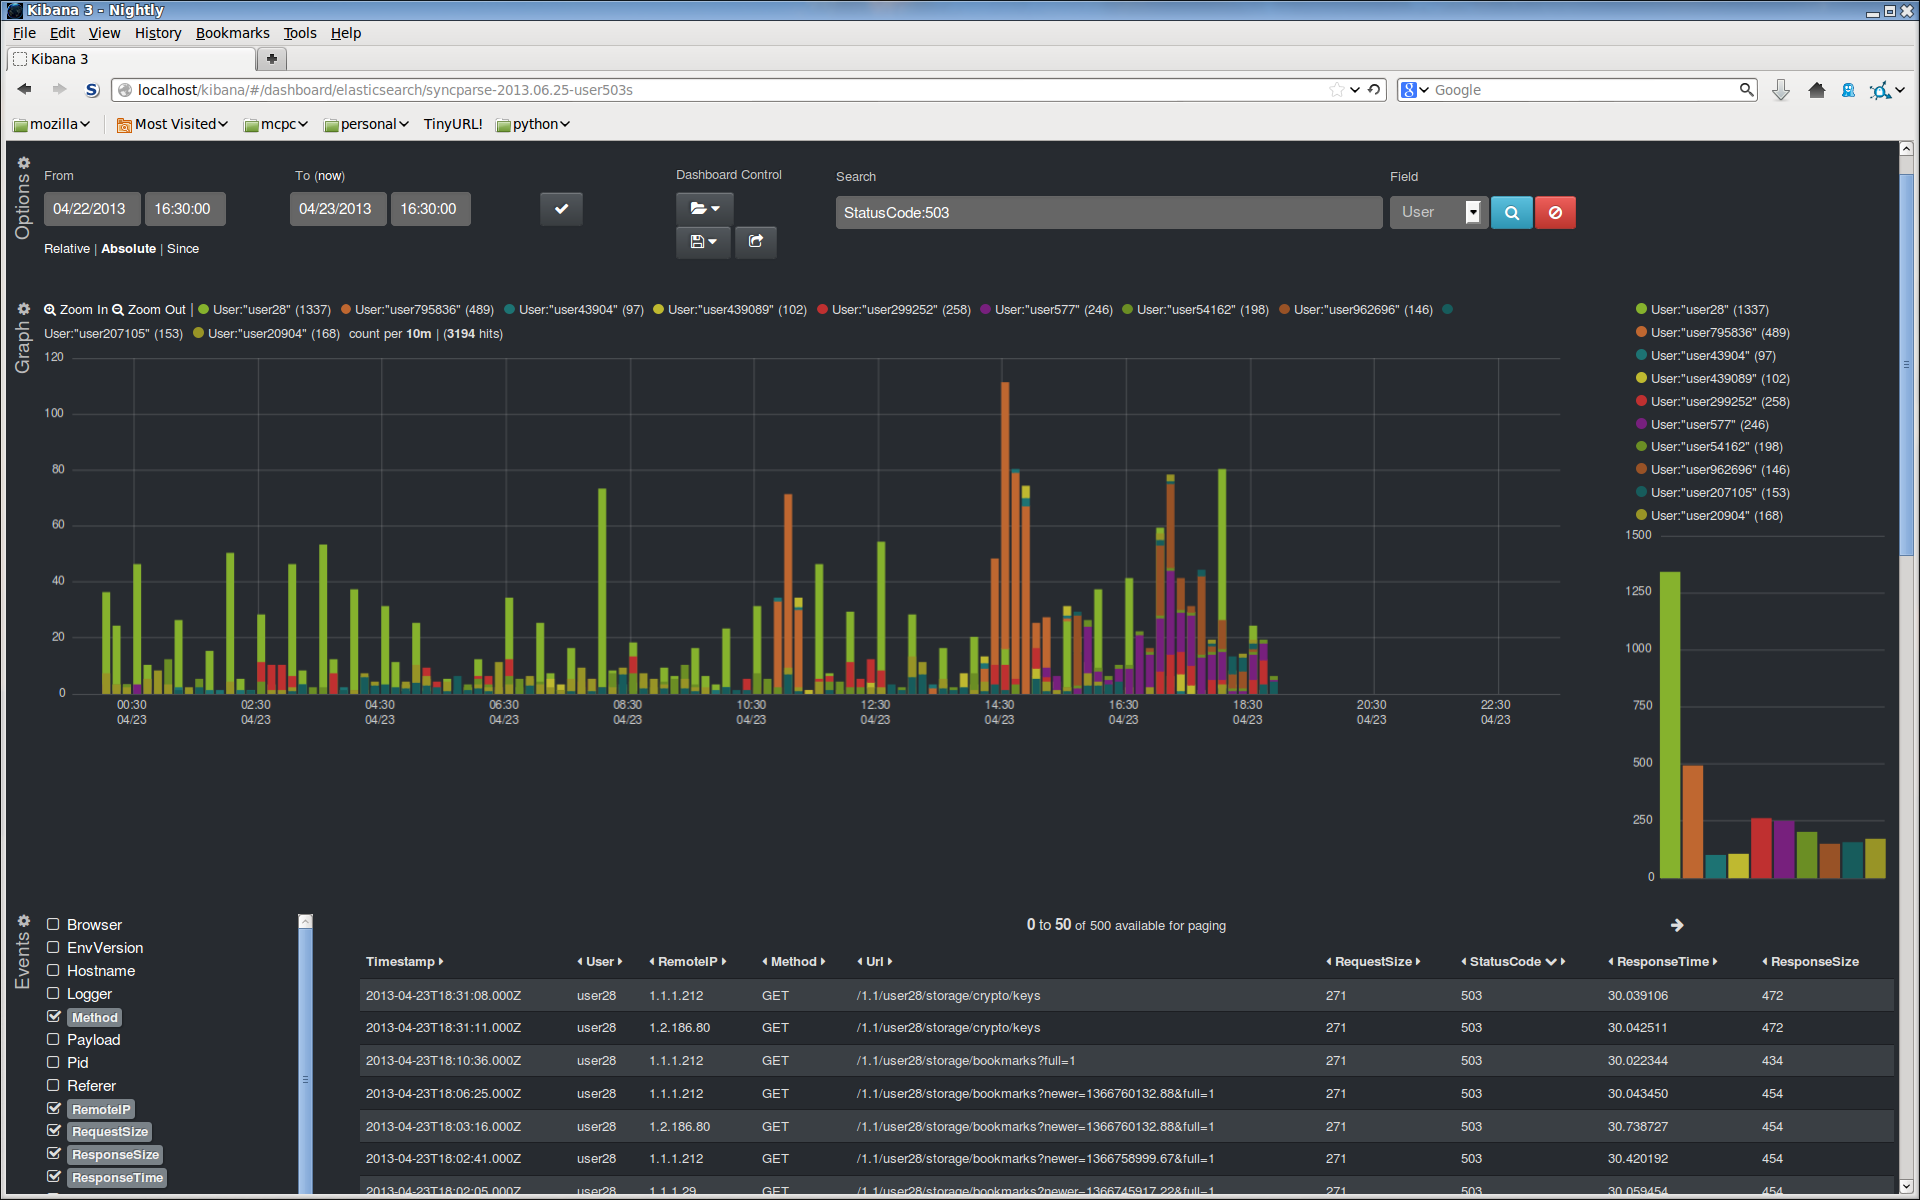
  • ElasticSearch output: We had just decided that we wanted to write Heka message data out to ElasticSearch (so we could search through our data using a Kibana dashboard) when we received a pull request from Tanguy Leroux providing exactly that. The screenshot below is of a Kibana dashboard. It is displaying a histogram of the 10 (anonymized) Firefox Sync users who received the most 503 HTTP response codes over a specific period of time, extracted by Heka from our load balancer log files.heka-kibana
  • Restartable plugins: It is now possible to specify any Heka input, filter, or output plugin as restartable, so it will reinitialize itself and start over when encountering an error. This is especially useful for plugins that require persistent connections to external services, as it allows them to reconnect. You can also set them to back off exponentially up to a user-defined cap, or add some timing jitter to prevent several reconnection attempts from happening simultaneously.
  • Resume-from-location log file parsing: When shutting down, LogfileInput will note where it stopped parsing a log file, and will try to pick up from the same location when it restarts.
  • Nagios output: If you use Nagios for monitoring, you can now use the NagiosOutput plugin to generate notifications triggered by Heka messages. Combine this with the ability to do arbitrary data processing in Heka’s dynamic Lua filters, and it becomes very easy to set up ad-hoc notifications for specific targeted events.
  • Improved text parsing: We’ve moved the regular expression match group capturing functionality out of the router and into a decoder, so it won’t slow down routing of messages that don’t use capture groups. We also managed to add some timezone-shifting functionality, for cases where a non-UTC time zone is used but not specified in the timestamps.
  • HTTP input: Thanks to an initial effort by David Delassus, we’ve now got an HttpInput plugin that will make HTTP requests and turn the resulting response bodies into Heka messages. You’ll need a custom Lua filter to parse the results and extract useful data, at least until the helpful decoders that we have under development are ready to take over that job for you.
  • Cloudwatch input & output: We’ve added plugins to get data out of and into Amazon’s Cloudwatch metrics service. They’re not in the Heka core, but they’re in the Mozilla Services repository of custom Heka plugins and are available in the released binaries.
  • New mailing list: There’s a new, dedicated Heka mailing list for announcements about changes to configuration options, Heka behavior, and anything else that might impact running Heka servers. Anyone interested in Heka should check it out!

As you can see, that’s a lot of progress. Big thanks to the Heka team and everyone who sent in patches, bug reports, and suggestions – keep them coming!

Heka is improving rapidly, but it’s still best suited for early adopters at this point. If you’re interested in rolling your sleeves up and digging in, please feel free to check out the binaries, the source code, and the documentation. And don’t forget to join the mailing list, and to drop in to the #heka channel on irc.mozilla.org to ask questions or share your experiences.

Introducing Heka

We here on the Mozilla Services team are happy to announce our first beta release (v0.2b1) of Heka, a tool for high performance data gathering, analysis, monitoring, and reporting. Heka’s main component is hekad, a lightweight daemon program that can run on nearly any host machine which does the following:

  • Gathers data through reading and parsing log files, monitoring server health, and/or accepting client network connections using any of a wide variety of protocols (syslog, statsd, http, heka, etc.).
  • Converts the acquired data into a standardized internal representation with a consistent metadata envelope to support effective handling and processing by the rest of the Heka system.
  • Evaluates message contents and metadata against a set of routing rules and determines all of the processing filters and external endpoints to which a message should be delivered.
  • Processes message contents in-flight, to perform aggregation, sliding-window event processing and monitoring, extraction of structured data from unstructured data (e.g. parsing log file output text to generate numeric stats data and/or more processing-friendly data structures), and generation of new messages as reporting output.
  • Delivers any received or internally generated message data to an external location. Data might be written to a database, a time series db, a file system, or a network service, including an upstream hekad instance for further processing and/or aggregation.

Heka is written in Go, which has proven well-suited to building a data pipeline that is both flexible and fast; initial testing shows a single hekad instance is capable of receiving and routing over 10 gigabits per second of message data. We’ve also borrowed and extended some great ideas from Logstash and have built Heka as a plugin-based system. Developers can build custom Input, Decoder, Filter (i.e. data-processing), and Output plugins to extend functionality quickly and easily.

All four of the plugin types can be implemented in Go, but managing these plugins requires editing the config file and restarting and, if you’re introducing new plugins, even recompiling the hekad binary. Heka provides another option, however, by allowing for “Sandboxed Filters,” written in Lua instead of Go. They can be added to and removed from a running Heka instance without the need to edit the config or restart the server. Heka also provides some Lua APIs that Sandboxed Filters can use for managing a circular buffer of time-series data, and for generating ad-hoc graph reports (such as the following example) that will show up on Heka’s reporting dashboard:

56

Heka is a new technology. We’re running it in production in a few places inside Mozilla, but it’s still a bit rough around the edges. Like everything Mozilla produces, however, it’s open source, so we’re releasing early and often to make it available to interested developers (contributors / pull requests welcome!) and early adopters. Here’s a list of resources for those who’d like to learn more:


Implementing cross-origin resource sharing (CORS) for Cornice

This article is the first technical one on the Mozilla services blog. Expect to read more technical content here in the future. We have been using our respective blogs so far to publish content, but we’ll try to publish the new ones on this blog.

For security reasons, it’s not possible to do cross-domain requests. In other words, if you have a page served from the domain lolnet.org, it will not be possible for it to get data from notmyidea.org.

Well, it’s possible, using tricks and techniques like JSONP, but that doesn’t work all the time (see the section below). I remember myself doing some simple proxies on my domain server to be able to query other’s API.

Thankfully, there is a nicer way to do this, namely, “Cross Origin Resource-Sharing”, or CORS.

You want an icecream? Go ask your dad first.

If you want to use CORS, you need the API you’re querying to support it; on the server side.

The HTTP server need to answer to the OPTIONS verb, and with the appropriate response headers.

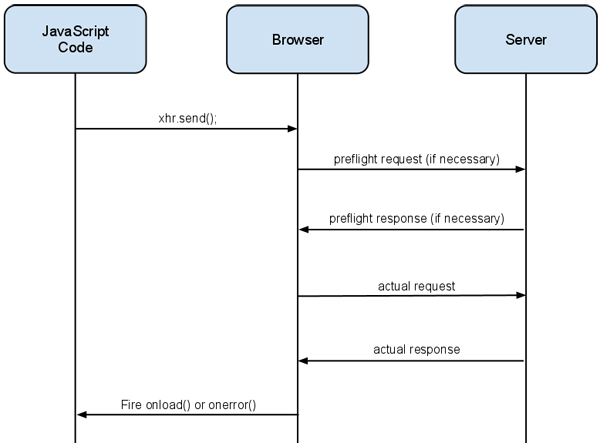
OPTIONS is sent as what the authors of the spec call a “preflight request”; just before doing a request to the API, the User-Agent (the browser most of the time) asks the permission to the resource, with an OPTIONS call.

The server answers, and tell what is available and what isn’t:

cors_flow

  • 1a. The User-Agent, rather than doing the call directly, asks the server, the API, the permission to do the request. It does so with the following headers:
    • Access-Control-Request-Headers, contains the headers the User-Agent want to access.
    • Access-Control-Request-Method contains the method the User-Agent want to access.
  • 1b. The API answers what is authorized:
    • Access-Control-Allow-Origin the origin that’s accepted. Can be * or the domain name.
    • Access-Control-Allow-Methods a list of allowed methods. This can be cached. Note than the request asks permission for one method and the
      server should return a list of accepted methods.
    • Access-Allow-Headers a list of allowed headers, for all of the methods, since this can be cached as well.
    1. The User-Agent can do the “normal” request.

So, if you want to access the /icecream resource, and do a PUT there, you’ll have the following flow:

> OPTIONS /icecream
> Access-Control-Request-Methods = PUT
> Origin: notmyidea.org
< Access-Control-Allow-Origin = notmyidea.org
< Access-Control-Allow-Methods = PUT,GET,DELETE
200 OK

You can see that we have an Origin Header in the request, as well as a Access-Control-Request-Methods. We’re here asking if we have the right, as notmyidea.org, to do a PUT request on /icecream.

And the server tells us that we can do that, as well as GET and DELETE.

I’ll not cover all the details of the CORS specification here, but bear in mind than with CORS, you can control what are the authorized methods, headers, origins, and if the client is allowed to send authentication information or not.

A word about security

CORS is not an answer for every cross-domain call you want to do, because you need to control the service you want to call. For instance, if you want to build a feed reader and access the feeds on different domains, you can be pretty much sure that the servers will not implement CORS, so you’ll need to write a proxy yourself, to provide this.

Secondly, if misunderstood, CORS can be insecure, and cause problems. Because the rules apply when a client wants to do a request to a server, you need to be extra careful about who you’re authorizing.

An incorrectly secured CORS server can be accessed by a malicious client very easily, bypassing network security. For instance, if you host a server on an intranet
that is only available from behind a VPN but accepts every cross-origin call. A bad guy can inject javascript into the browser of a user who has access to your protected server and make calls to your service, which is probably not what you want.

How this is different from JSONP?

You may know the JSONP protocol. JSONP allows cross origin, but for a particular use case, and does have some drawbacks (for instance, it’s not possible to do DELETEs or PUTs with JSONP).

JSONP exploits the fact that it is possible to get information from another domain when you are asking for javascript code, using the <script> element.

Exploiting the open policy for <script> elements, some pages use them to retrieve JavaScript code that operates on dynamically generated JSON-formatted data from other origins. This usage pattern is known as JSONP. Requests for JSONP retrieve not JSON, but arbitrary JavaScript code. They are evaluated by the JavaScript interpreter, not parsed by a JSON parser.

Using CORS in Cornice

Okay, things are hopefully clearer about CORS, let’s see how we implemented it on the server-side.

Cornice is a toolkit that lets you define resources in python and takes care of the heavy lifting for you, so I wanted it to take care of the CORS support as well.

In Cornice, you define a service like this:

from cornice import Service

foobar = Service(name="foobar", path="/foobar")

# and then you do something with it
@foobar.get()
def get_foobar(request):
    # do something with the request.

To add CORS support to this resource, you can go this way, with the cors_origins parameter:

foobar = Service(name='foobar', path='/foobar', cors_origins=('*',))

Ta-da! You have enabled CORS for your service. Be aware that you’re authorizing anyone to query your server, that may not be what you want.

Of course, you can specify a list of origins you trust, and you don’t need to stick with *, which means “authorize everyone”.

Headers

You can define the headers you want to expose for the service:

foobar = Service(name='foobar', path='/foobar', cors_origins=('*',))

@foobar.get(cors_headers=('X-My-Header', 'Content-Type'))
def get_foobars_please(request):
    return "some foobar for you"

I’ve done some testing and it wasn’t working on Chrome because I wasn’t handling the headers the right way (The missing one was Content-Type, that Chrome was asking for). With my first version of the implementation, I needed the service implementers to explicitely list all the headers that should be exposed. While this improves security, it can be frustrating while developing.

So I introduced an expose_all_headers flag, which is set to True by default, if the service supports CORS.

Cookies / Credentials

By default, the requests you do to your API endpoint don’t include the credential information for security reasons. If you really want to do that, you need to enable it using the cors_credentials parameter. You can activate this one on a per-service basis or on a per-method basis.

Caching

When you do a preflight request, the information returned by the server can be cached by the User-Agent so that it’s not redone before each actual call.

The caching period is defined by the server, using the Access-Control-Max-Age header. You can configure this timing using the cors_max_age parameter.

Simplifying the API

We have cors_headers, cors_enabled, cors_origins, cors_credentials, cors_max_age, cors_expose_all_headers … a fair number of parameters. If you want to have a specific CORS-policy for your services, that can be a bit tedious to pass these to your services all the time.

I introduced another way to pass the CORS policy, so you can do something like that:

policy = dict(enabled=False,
              headers=('X-My-Header', 'Content-Type'),
              origins=('*.notmyidea.org'),
              credentials=True,
              max_age=42)

foobar = Service(name='foobar', path='/foobar', cors_policy=policy)

Comparison with other implementations

I was curious to have a look at other implementations of CORS, in django for instance, and I found a gist about it.

Basically, this adds a middleware that adds the “rights” headers to the answer, depending on the request.

While this approach works, it’s not implementing the specification completely. You need to add support for all the resources at once.

We can think about a nice way to implement this specifying a definition of what’s supposed to be exposed via CORS and what shouldn’t directly in your settings. In my opinion, CORS support should be handled at the service definition level, except for the list of authorized hosts. Otherwise, you don’t know exactly what’s going on when you look at the definition of the service.

Resources

There are a number of good resources that can be useful to you if you want to either understand how CORS works, or if you want to implement it yourself.

Of course, the W3C specification is the best resource to rely on. This specification isn’t hard to read, so you may want to go through it. Especially the “resource processing model” section

Finally, you may want to have a look at the actual implementation in Cornice.

Retiring Firefox Home

From the early days, Mozilla has been focused on empowering users across platforms and devices.  We released Firefox Home as an experiment in bringing a part of the Firefox experience to iOS, focusing on Firefox Sync.  This project provided valuable insight and experience with the platform, but we have decided to remove Firefox Home from the Apple App Store and focus our resources on other projects.

For those interested in continuing to use or improve the iOS Sync client that Firefox Home is built on, we have made the source available on GitHub, free of Mozilla trademarks and ready for independent development.  As with all Mozilla projects, we ask developers to be aware of the Mozilla trademark policy.

We remain committed to providing compelling user experiences across as many platforms and devices as possible and will continue to explore the best ways to provide great experiences to iOS users.

– mconnor, on behalf of the Firefox and Services teams

Add-on Sync Coming to Firefox

We strive to make your online experience better and we have a new feature in the latest Firebox Beta we think you’ll love: add-on sync.

Add-on sync does what its name implies: it synchronizes add-ons between profiles connected with Firefox Sync. Specifically, it will install, uninstall, enable, and disable add-ons across your devices as you do.

If you are a new Sync user, add-on sync will be enabled by default. However, since Mozilla cares about your privacy and we don’t want to do anything without your explicit permission, existing Sync users will need to manually opt in to the feature. This can be done through the Sync tab in Firefox’s Preferences window. Explicit instructions are available at https://support.mozilla.org/en-US/kb/how-do-i-enable-add-sync.

Once you have add-on sync enabled, you don’t need to do anything special to get your add-ons to sync. As you use your browser, Sync will run in the background. As it does, the current state of your add-ons will be collected and sent to the sync server. As you use your other devices, Sync will apply changes to your local Firefox. Add-on sync runs in the background and you won’t see any pop-ups indicating it is running. And, since some add-ons require a restart for changes to be made, you may not see your new add-ons until you restart your browser. Our studies show that over 99% of Firefox users restart their browser at least daily, so you shouldn’t have to wait too long. If you are curious, you can open the Add-on Manager (about:addons) and see what changes will occur on the next restart.

There are a number of challenges involved with synchronizing add-ons. Because of this, the scope of the initial add-on sync feature has intentionally been limited. For this initial release, an add-on will be synchronized only if all of the following criteria are met:

  • It is an extension or theme
  • It is installed from https://addons.mozilla.org/
  • It is publicly listed on the add-ons site
  • It is installed into the current profile by the user

For now, add-ons are only synchronized between identical application types – changes to a desktop browser will only affect other desktop browsers and changes to a mobile browser will only affect other mobile browsers. Greater functionality between desktop and mobile will come in the future.

Security and privacy are important concerns when designing add-on sync. As with all your Firefox Sync data, add-on data is encrypted in your browser before being transmitted to the Sync server. So, people in the cloud can’t tell what add-ons you have installed, even if they wanted to know.

Add-on sync is a feature in progress and are working on further updates to include in later Firefox releases. You can learn more about add-on sync including background on some key design decisions at https://wiki.mozilla.org/Services/Sync/Addon_Sync. If you would like to get involved, instructions for reaching us can be found at https://wiki.mozilla.org/Services/Sync#Get_Involved.

We hope add-on sync makes managing your online experience with Firefox a little easier. Happy syncing!